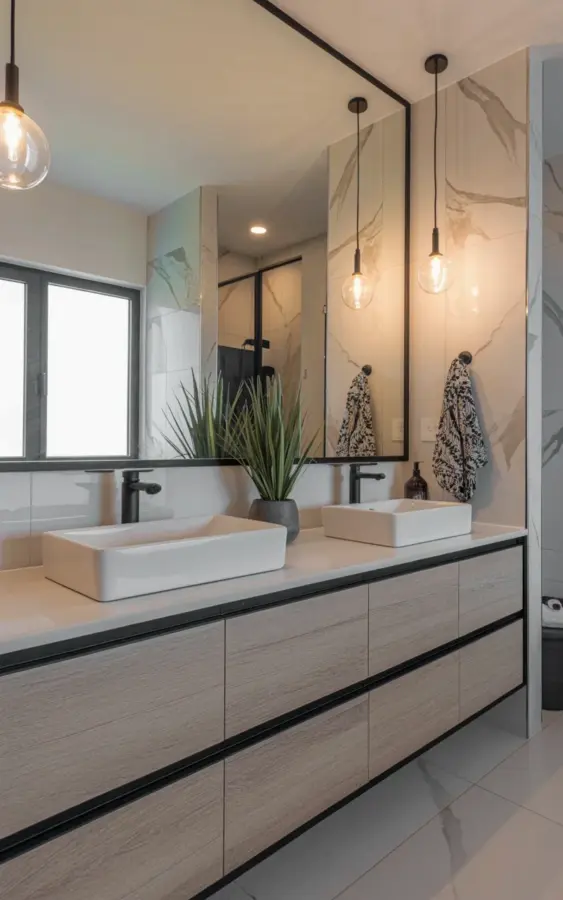
We finally did it. The bathroom renovation we had been pushing off for months. Our old vanity was so outdated, it honestly embarrassed me every time someone visited. But now, seeing this double sink vanity before and after, I can barely recognize the room. The biggest change? A floating light wood design with two rectangular vessel sinks, black hardware, and those gorgeous clear glass pendant lights. It feels like a completely different space. And the white marble tile with soft gray veining? That really sealed the modern look. Two potted plants with long green leaves soften everything just enough. Planning a modern bathroom makeover? Pin this for inspiration, but also read on because I’m going to walk you through exactly how we pulled it off, step by step.
How We Chose the Floating Light Wood Vanity
So here’s the thing. I spent weeks scrolling through modern bathroom ideas online and kept coming back to the floating look. It makes the floor feel bigger, cleaner. Our old vanity sat on the ground like a sad, heavy block. Not gonna lie, I was nervous about the structural part. You have to anchor a floating vanity into wall studs, and our walls were old plaster. That added a whole afternoon of work. But the result is worth every drill bit. We went with a light wood grain finish, something in a warm birch tone. The grain texture is visible but subtle, not too busy. It pairs nicely with the white countertop and the black horizontal handles. One thing I didn’t expect: the floating style makes the room feel taller. Even with a low ceiling, that open space underneath draws your eye up.
We measured twice, ordered once. Actually, we measured three times. And still got the width slightly wrong. Had to cut a quarter inch off the back side where it meets the tile. You don’t see it, but I know it’s there. Anyway. The vanity came in three pieces: two drawer banks and a center cabinet. Assembly took a couple hours. The directions were terrible, honestly. But the wood quality is solid, real plywood, not that particle board stuff. That’s a must for a double sink vanity. It holds a lot of weight, especially with two vessel sinks full of water.
Picking the Right Vessel Sinks for a Double Vanity Setup
I was skeptical about vessel sinks at first. They look beautiful in photos, but are they practical? Short answer: yes, with the right shape. We chose rectangular vessel sinks, and here’s why. Round ones splash more, I’ve tested that in a friend’s bathroom. The rectangle gives you a wider basin, so water has more room to settle before hitting the sides. Still, expect some splashing. Get a tall faucet, at least six inches from the counter to the spout outlet. We went with brushed nickel faucets that have a slight curve. They match the black hardware without being matchy-matchy. That’s important, I think. You want cohesion, not clone.
The material of the sinks matters too. Ours are vitreous china, glossy white, with a slight inward slope on the bottom. That helps water drain quickly and leaves less residue. If I had one complaint, it’s that vessel sinks accumulate toothpaste spatter on the outside rim. You have to wipe them down daily. But that’s a small price for the look. For a double sink vanity with vessel sinks, make sure the counter is wide enough. Ours is 60 inches. That gives each person about 28 inches of personal space. Enough for elbows and a toothbrush holder. Not enough for full bathroom dance moves, but that’s fine.
The Tile Decision: White Marble Look with Gray Veining
Tile nearly broke us. We looked at subway tile, hexagon, stacked stone, even that chevron pattern. In the end, we went with large format white marble look tile. The slabs are about 12 by 24 inches. The gray veining is subtle, not dramatic, which is exactly what I wanted. It doesn’t fight with the light wood or the black accents. Installation was tricky because the walls weren’t perfectly square. Our tilers had to cut some pieces narrower near the ceiling. You can’t tell unless you put a level on it. I did put a level on it. It’s fine.
One practical tip: use a matte finish tile, not high gloss. The gloss shows every water spot and fingerprint. Ours has a soft polished surface that reflects light gently without being a mirror. And it’s easier to clean. We sealed the grout with a stain-resistant sealer because white grout is terrifying. Also, we chose a light gray grout instead of bright white. Less maintenance. The tile runs from floor to ceiling behind the vanity and into the shower area. That continuity makes the room feel bigger. Honestly, if you are doing a bathroom renovation, splurge on ceiling height tile. It’s worth the extra rows.
Lighting That Makes the Sinks Pop: Clear Glass Pendants
Lighting was a late decision. I originally wanted sconces on either side of the mirror. But the double sink vanity is so wide that sconces would have been awkwardly placed. So we went with pendant lights. Clear glass globes, about 10 inches in diameter, hanging from black metal fixtures. They drop down about 12 inches from the ceiling. The effect is clean and modern. Each globe has a single Edison bulb inside, soft white, 2700K. Not too cool, not too warm. You see the filament through the glass, which adds a slight industrial touch. I love that.
But here is a weird detail I noticed later. The pendants are centered over each sink basin, not centered over the vanity width as a whole. That means the fixture on the left hangs slightly closer to the wall than the one on the right, because of a cabinet door swing. It doesn’t look unbalanced because the mirror spans the whole width, framing everything. The clear glass means they almost disappear during the day. At night, they create two pools of light on the counter. It’s dramatic without being harsh. I will say, cleaning dust off the globes is annoying. They attract every bit of lint. But that’s a small trade off for the look.
Hardware and Small Details That Tie It Together
The black horizontal handles on the vanity drawers are long, eight inches each. I chose them because they echo the clean lines of the sinks. No curves, nothing ornate. Just straight bars. They contrast nicely with the light wood and white counter. But here’s the thing: black hardware shows fingerprints. I wipe them with a microfiber cloth almost every day. That’s fine, it takes ten seconds. Also, we added a large frameless mirror that spans the entire width of the vanity. No frame, just beveled edges. It reflects the pendant lights and makes the room feel twice as big. That was the best bang for buck, honestly. The mirror cost less than $150 from a local glass shop.
The two potted plants on the counter? Fake. I know, I know. But our bathroom has no natural light. Real plants would die within a week. I found these artificial ones with long, narrow green leaves that look like a type of snake plant. They add life without the guilt. One sits near the left sink, one near the right. That’s it for decor. No candles, no trays full of stuff. We wanted a clutter free modern bathroom. Here’s a quick list of the small things that make a big difference:
- Cabinetry pulls: keep them consistent. Don’t mix knobs and handles on the same vanity.
- Faucet height: for vessel sinks, the spout needs to be at least 5 inches above the rim to avoid hitting your hands.
- Toilet paper holder: we mounted it on the side of the vanity, not the wall. Saves space and looks built-in.
- Outlet placement: we moved one outlet to inside the vanity drawer. Hair dryers stay plugged in but hidden.
- Caulk color: match the caulk to the countertop, not the tile. White counter, white caulk. It disappears.
Our Before and After: Lessons Learned (and What I’d Do Differently)
The before picture is painful. Brown laminate countertops, a builder grade mirror with a big wood frame, and a single sink. It was dark and cramped. The after is airy and bright. But I won’t pretend everything went smoothly. We hit a pipe during demolition. That added a plumber visit and $400. The vanity shipped with a scratch on one drawer front. We patched it with wood filler and it’s barely visible, but I still notice it. And the vessel sinks? They do splash a little more than a standard undermount sink. But for the style, I’d do it again.
One thing I would change if I could redo: the drain configuration. Vessel sinks often come with a pop up drain that’s kind of cheap. Ours are okay, but the seal around the rubber gasket is not perfect. I’d buy higher quality drain kits separately. Also, the pendant lights are not dimmable. We installed them before choosing the bulbs and didn’t check. Dimmable would be nice for evening baths. But honestly, these are minor quibbles. The room works. It feels like a spa, and that’s what we wanted.
If you’re planning your own bathroom makeover, take your time on the layout. Measure the double sink vanity space, the clearance for the vessel sinks, the height of the pendant lights above the counter. Keep a notebook. I wrote down every mistake so the next person (or my future self) doesn’t repeat it. Also, buy extra tile. We were short by three pieces and the matching dye lot was gone. Had to order from a different batch and the veining is slightly different. No one else sees it, but I do. Every single time.
So that’s the story. Our floating light wood vanity with rectangular vessel sinks, black handles, clear glass pendants, white marble tile, and two fake plants. Not gonna lie, it turned out better than I imagined. If you are even considering a double sink vanity, go for it. Just plan ahead, measure three times, and accept that something will go wrong. Then fix it. And then enjoy your new modern bathroom. Got questions? Drop them in the comments or pin this for later. Happy renovating.
#double_sink_vanity #modern_bathroom_ideas #bathroom_makeover #vessel_sinks #bathroom_renovation
Leave a Comment