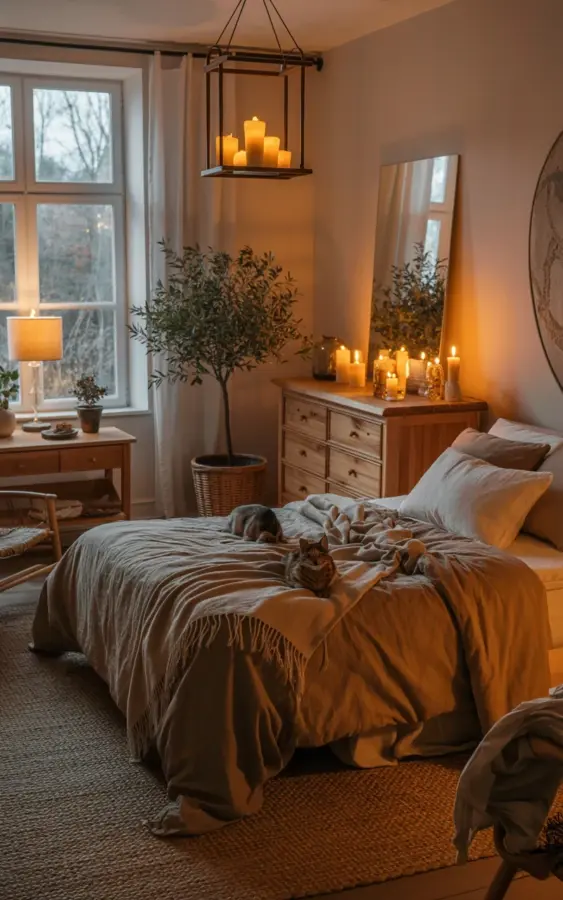
I never thought I would become that person who turns a bedroom dresser into a bathroom vanity. But after months of scrolling through the same old bathroom vanity ideas online, nothing felt right for my tiny space. Then one evening I walked into my bedroom and saw the warm glow of candles reflecting off an old wooden dresser, a large mirror leaning against the wall behind it, and a black metal lantern hanging from the ceiling with a few flickering tea lights. A potted olive tree in a woven basket sat in the corner. The whole room felt like a cozy retreat. And right then it hit me: that dresser, that mirror, those candles… they belonged in my bathroom. So I went for it. This is the story of how a rustic wooden dresser conversion turned my cramped bathroom into a spa like hideaway.
Why a Dresser Vanity Works Better Than a Store Bought Option
Honestly, most bathroom vanities you buy off the shelf feel the same. They are made of MDF, they have that plastic shine, and they cost way more than they should. A dresser vanity, on the other hand, gives you real character and actual storage. My dresser has six deep drawers. That holds towels, toiletries, a hair dryer, and even some extra candles. You do not get that kind of space from a standard 36 inch vanity.
The best part? A dresser already has a finished top. You do not need to add a prefab countertop or a sink basin if you do not want one. In my case, I cut a hole for a vessel sink and let the natural wood grain show around it. That warm wood tone is what makes the room feel like a cozy bathroom instead of a cold tile box.
Choosing the Right Rustic Wood Dresser for Your Bathroom
Not every dresser is made for bathroom life. You want solid wood, not particle board. Particle board swells and falls apart the second humidity hits it. I found mine at a thrift store for forty dollars. It was painted a sad beige, but underneath was gorgeous oak. I sanded it down and let the natural color come through.
Look for a dresser with drawers that slide smoothly. You will be opening them with wet hands sometimes, so nothing sticky or finicky. Also pay attention to the height. Standard bathroom vanity height is around 32 to 34 inches. My dresser was 31 inches tall, so I added small furniture risers underneath. That extra inch or two makes a big difference when you lean over the sink.
How to Seal and Protect a Wooden Dresser for Bathroom Use
Water is the enemy of any wood project. If you skip the sealing step, you will regret it in about three months. I used a marine grade polyurethane because it is designed for boats. Yes, it smells strong, but it holds up against splashes and steam. I applied three thin coats, sanding lightly between each one.
Pay extra attention to the top surface around the sink. Also seal the inside of the drawers where you might store damp washcloths. Here is a quick list of what I used and recommend:
- Marine grade polyurethane (water based for less yellowing)
- Fine grit sandpaper (220 grit)
- A foam brush for even application
- Painter’s tape to protect the drawer fronts
- Silicone caulk to seal the gap between the sink and the wood
Take your time with this step. A rushed seal job will crack and peel, and then your pretty dresser will look like a mess.
Creating a Cozy Bathroom Ambiance with Candles and Warm Lighting
The picture that inspired all of this had a black metal lantern hanging from the ceiling with multiple lit candles. I copied that exact idea for my bathroom. But instead of a hanging lantern (which felt too low in a small bathroom), I placed a similar lantern on a corner shelf. The candles inside give off a soft, flickering light that makes the wood tones glow.
I also put a few glass candle holders on the dresser top, between the mirror and the sink. The key is to use unscented or very lightly scented candles. You do not want your bathroom to smell like you are baking a pie while you brush your teeth. Beeswax candles work well because they burn clean and have a subtle honey smell. The warm candlelight combined with the wooden dresser creates that spa like atmosphere everyone talks about, but it actually works.
The Perfect Mirror and Accessories for a Rustic Vanity Look
My mirror is a large rectangular one with a simple wooden frame that I found at a flea market. It leans against the wall behind the dresser instead of being hung. That gives the room a casual, lived in feel. If you want to mount yours, make sure it is at a height that works for everyone in the house. I keep mine at eye level for my height, but you can adjust it with a piece of furniture behind it if you need to.
Accessories should be simple and functional. A small woven basket holds extra hand towels. A ceramic soap dispenser matches the warm tones. And do not forget a potted plant. In the photo that inspired me, there is an olive tree in a woven basket. I have the same thing in my bathroom now. Olive trees tolerate lower light and dry air surprisingly well. Just make sure you have a saucer underneath so water does not ruin the dresser top.
Bathroom Decor with Plants: More Than Just a Pretty Addition
Plants soften the hard edges of a bathroom renovation. They also help the room feel alive and fresh, which is nice when you are dealing with a small space that might otherwise feel cramped. Besides the olive tree, I added a small fern on a corner shelf and a trailing pothos on top of the mirror. The pothos vines hang down and frame the mirror beautifully.
When you add greenery to a bathroom vanity setup, choose plants that love humidity. Ferns, pothos, snake plants, and peace lilies all do well. Stay away from succulents unless you have a very dry bathroom. And remember, every plant needs a drainage saucer or a cachepot. You do not want water rings on your beautiful wooden dresser. That would undo all the sealing work.
My Personal Tips for a Successful DIY Vanity Project
If you decide to try this yourself, start with a dresser that already has the vibe you want. Do not buy a cheap laminate piece and hope to make it rustic. Look for solid wood with dovetail drawer joints. That is a sign of quality, and it means the dresser will last through years of bathroom humidity.
Also, measure your sink and faucet before you cut the hole. I measured three times and still went an inch too far left. I had to patch it with wood filler and sand it down. Not the end of the world, but it added an extra day to the project. Use a template from the sink manufacturer. And if you are not comfortable cutting the hole yourself, ask a friend with a jigsaw. It is a straightforward cut if you go slow.
Finally, embrace small imperfections. My dresser has a few nicks and the wood grain is not perfectly even. That is what makes it rustic. Do not try to make it look like a factory product. The whole point of a dresser vanity is that it feels personal. Candles, a mirror, some plants, and a warm wooden piece can turn a boring bathroom into your favorite room in the house.
If you are thinking about a similar project, I would love to hear your ideas. Drop a comment below or save this pin for later. A little candlelight and a lot of patience can go a long way.
#bathroomvanityideas #rusticvanity #dresservanity #cozybathroom #bathroomdecor
Leave a Comment